Sunday, April 29, 2012

Diy Hanging Map

I always enjoy easy decor ideas that can spruce up a room without going to crazy and redoing the whole house like this:

 or this:

I really do admire people who paint they're ceiling.

Back to putting no effort into your home decor - Rachel from Smile and Wave wrote this really cool tutorial about how to make your own Map Hanging.

Check it out here!

And this is a project short people can do too!

Peplum Suit Pattern

I just love Kate Middleton. Everything about her is perfect. Her hair, her style... her hair. I do hope she's a nice person too. I think I started loving navy thanks to her.
I very much admire her being able to wear conservative clothing but not look like she's going to the office or something (maybe it's the tiny feathery hats).
I love this peplum suit she's wearing in the picture below. And no, the fact that it's navy has nothing to do with me liking it. Really.

Ok fine it does.

Anyway, if you want to make it yourself, here's a nice pattern you can use:


Simplicity 1400 Vintage Sewing Pattern

This one is less peplum-y: (and not vintage)
 

And if you want to look like whipped cream:

  Kwik Sew Ruffle Bolero Jacket Pattern

(Sorry, i know this has nothing to do with the suit, but it kind of reminded me of a peplum)

Thursday, April 26, 2012

Make it Yourself - Peplum Skirt

How beautiful is this skirt??
I love the color and the shape, it's a plain pencil skirt, but with a twist! Perfect for the office, but perfect for a night out in the town! I can just picture it with a white button down chiffon blouse and back heels.

javascript:; I stumbled upon this on Modcloth, my FAVORITE online store. Sadly, I never buy anything from there because the prices are a little too high for me, but I love looking around to get inspiration for sewing projects.


Speaking of which, I found an exact pattern of this skirt on amazon and thought I'd share it with you, it looks quite easy, the skirt is basically built from three panels and the peplum.


You can buy it here!

Tuesday, April 24, 2012

Diy Circle Shirt

As promised! I'm going to show you how to make these three really easy shirts!
I used a sewing machine to make this shirt, but i guess you could sew it by hand if you had the patience. Also, i serged all the raw edges before sewing, because i hate unfinished edges (They used to call me anal girl), but this is not necessary if you don't have a serger.

What you will need:


The fabric I used was this kind of stretchy chiffon. If you want to make the shirt tight (like version 1), I suggest using a stretchy fabric unless you want to insert a zipper - in which case you would have to alter the pattern to accommodate a zipper. If you want to make a wider shirt (like versions 2, 3) you can use a non stretch fabric, but either way the fabric should have a nice fall to it (like chiffon, knit, silk and so on).
Lets get to it!

Fold your fabric two times and place it like in the picture: one fold on the left, two folds at the top.
Measure and Mark:
Neckline: measure how wide you wan your neckline to be from the middle of your neck - outwards, I made it to be 10 cm all around. Mark this along the Green lines.
Sleeves: measure how long you want your sleeves to be, from the middle of your neck along the shoulder and arm. Mine was 26 cm. Mark this along the Blue line.
Length of shirt: measure how long you want your shirt to be from the middle of the neck, down. I made it to be 56 cm. Mark this along the Red line. 
Now, connect number 1 to 2 and 3 to 4 with curved lines to create the circle shirt.
Once you cut the fabric it will look like this:


Next you have to decide what kind of shirt you want to make. I ended up making the SJP version (version 3) but they're all easy to do.

Version 1:
Hem the whole bottom of the shirt (the larger circle)


Fold fabric into quarters (as pictured above), measure the width of your hips and divide by 4 add 0.5 an inch. When you spread the fabric out, the markings will be  half of the hip circumference apart (with 1 inch ease) like this: 

Sew a line about 20 cm up (wrong sides of fabric together), these will be your side seams.
This is basically what your shirt looks like.
Hem the neckline and your shirt is finished!

Version 2:
This is basically the same as version 1, only you have to sew the side seams in a slant
This will make the shirt wider.

Version 3:
This is a little more difficult. But not that much. Really.


Measure 15 cm and mark along the red line. This will be the sleeve hole.
Measure 1/4 hip circumference and add 5 cm, mark this along the blue line.
Open the fabric up and sew between the pin marks:

Sew the two layers between 1 and 2. 3 and 4 (right sides of fabric together).
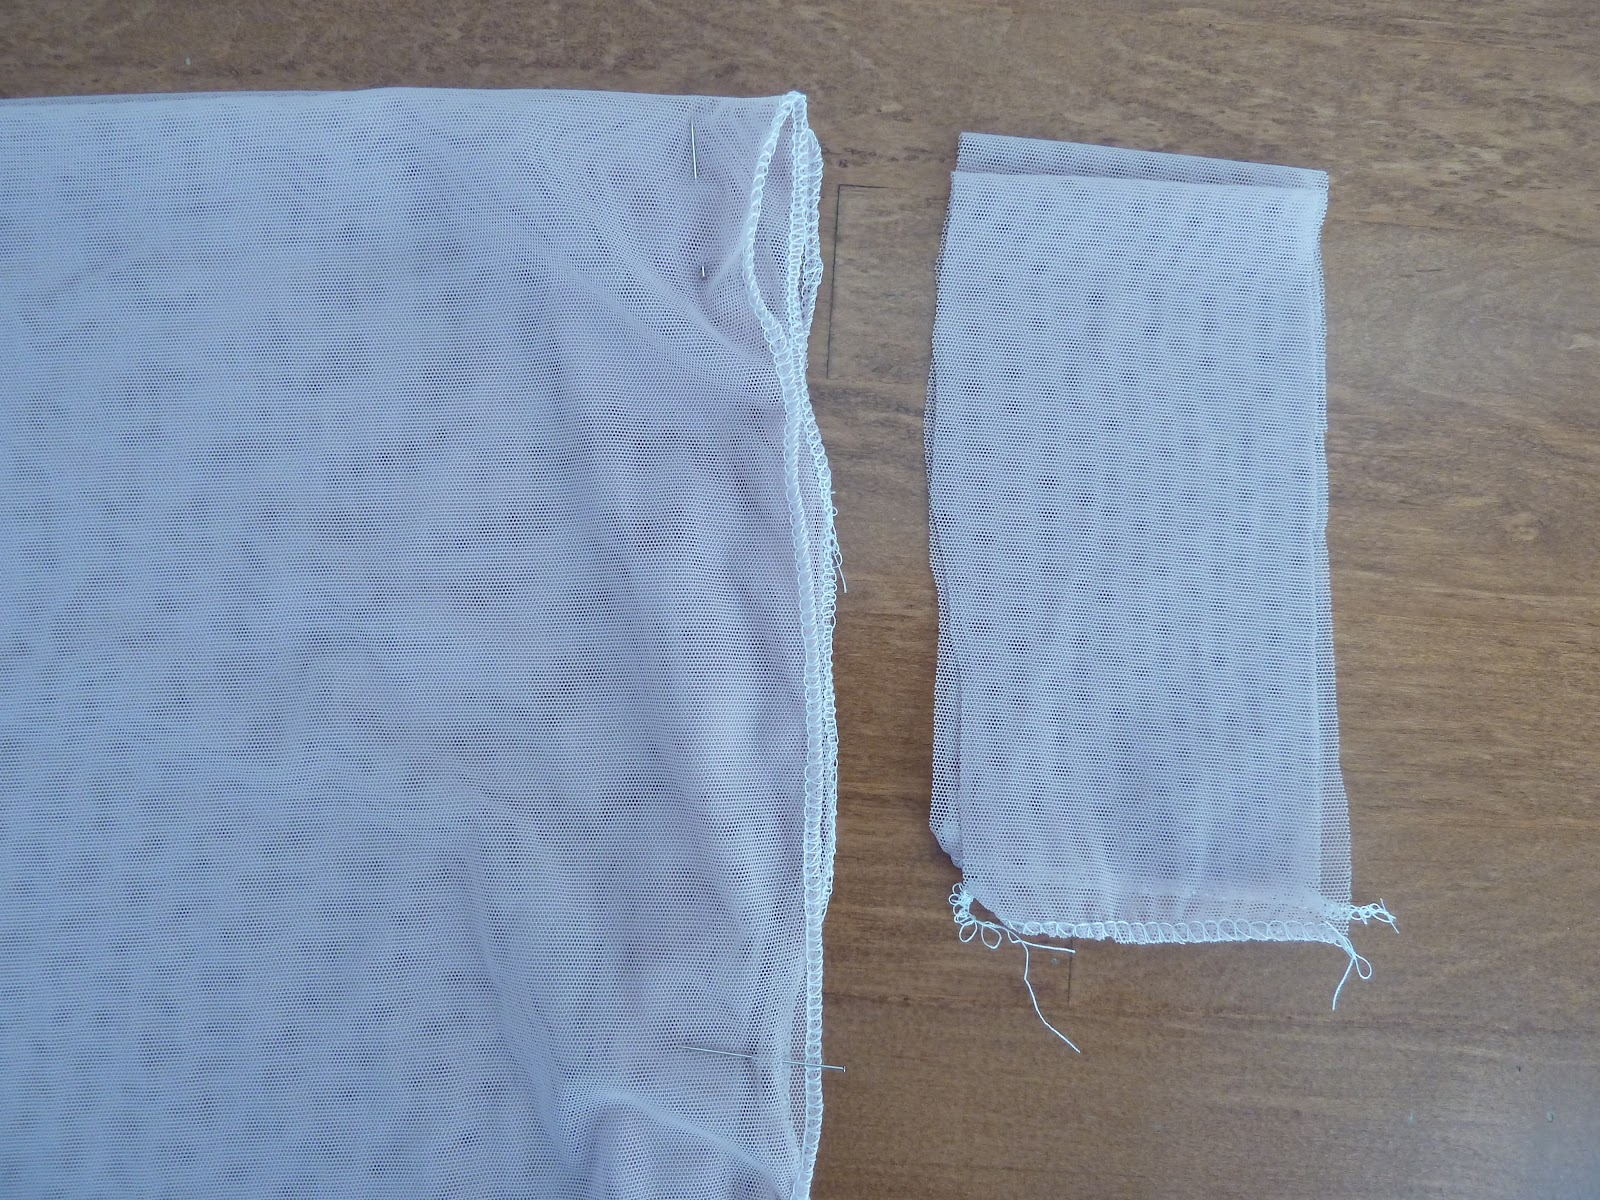
Next we'll create the sleeves, cut two strips 16 cm (1 cm seam allowance) long and however wide you want (I made them 10 cm), attach the short side of the strips to create tubes that are 15 cm long (Minus the seam allowance).


Fold the tube lengthwise (so that the tube has one side on the fold and the other is two raw edges) and attach the raw edges of the tube the the sleeve hole we created before.
Next, hem the neck hole and the bottom hem and you have your shirt!

What do you think? Will any of you try this?
as this is my first tutorial, I'd love to hear if it was easy to follow and understand and if the pictures were detailed enough. Thanks for reading!

So, FINALLY the picture of the shirt!


For the full post on the project click here.

Saturday, April 14, 2012

Diy circle top

I've been seeing these kind of shirts for a while now and I just can't get over how easy they are to make.

Circle Top 1
Source

They're also quite expensive which makes me feel even better about diy-ing a shirt like this.

This is a kind of wider version:

Circle Top 2
Source

This is my favorite, could be because it's worn by SJP, but the sleeves kind of give it an oomph:

Circle Top 3
Source

ANYWAY, I will post tutorials in the next week for all three shirts! I promise it's really easy and even beginner sewers can do this.

What do you think?

UPDATE: Here is the link to my tutorial, Enjoy!
 

Tuesday, April 10, 2012

DIY Neon Cap Shoe

Sometimes I have trouble latching on to ideas and trends. I don't know if i consider myself incredibly open minded about fashion, but looking at other blogs i can really tell that I might be a little behind when it comes to completely embracing new and bizarre trends.

Exhibit A:

Neon Bag
Source

How shiny are this girls legs? I wish my legs looked so soft and perfect, they even have a neon yellow aura! (yes I am aware that the laws of physics - the light bouncing off the bag and reflecting on her leg - are what cause her legs to shine in yellow and not some divine intervention. Let a girl yearn and slobber over some other girls legs. Jeez.)

Neon Blazer
Source

Neon Dress
Source

I don't know if I ever see myself standing on a beautiful sun washed staircase (that's probably leading to the Collosium or the MET or something) wearing a huge puffy yellow dress oh so casually texting my identically dressed boyfriend not minding that half my dress is cleaning up the streets of New York (or Rome).

So maybe wearing a full on neon garment is a little too much for me (even though I have to admit, I'm completely falling in love with the blazer in the picture above and already looking for a neon yellow messenger bag on ebay), but this is a nice alternative - how about a neon capped shoe?

Neon Capped Shoe

Check out the easy Diy over at A Pair and Spare

Upside-down French Braid

This is really beautiful!

some_text

Check out how to do it on Sidewalk Ready:


I think I'll try this! I have to put up my hair for work now and just doing a ponytail is so boring. looks like a cool way to spice it up a bit!

Saturday, April 7, 2012

Making the Curls Stay

Speaking of hair, I have stick straight hair that can never ever hold a curl.
i rarely bother to do anything with it, mostly because it looks fine without me messing with it and working half an hour on my hair and then having the curl unravel seems stupid.
Steph, from Hair and Makeup by Steph explains how to make you hair stay in place and retain the curls you worked to hard to do.
What do you think?
How to Make Your Curls Stay
Stay Curls

I think I'm going to peruse her blog some more. Maybe there will be an answer to my incredibly thin flat hair (Yes, I do have some issues with my hair).

Wednesday, April 4, 2012

My Favorite Things

This will be my Outlet.
Why my thoughts and words should interest anyone else but me is beyond me, but that's the point of blogging, right?
Here I will write about Fashion, Sewing, Food, Home Decor and anything else that entices me at the moment.
In the spirit of sharing my Favorite Things, let us indulge ourselves in this all time, happy making, jiggle inducing, Favorite:

Related Posts Plugin for WordPress, Blogger...